HTML5 Canvas: How to Draw Graphics on the Web
The following is a list of the most common questions we get from our customers.
What is Canvas?
The HTML5 canvas element enables the drawing of graphics on a webpage using JavaScript. Initially introduced by Apple for Mac OS dashboard widgets and Safari web browser graphics, it was later adopted by Firefox, Google Chrome, and Opera. Currently, the canvas is a vital component of the HTML5 specification, catering to next-generation web technologies.
By default, the <canvas> element has a width of 300px and height of 150px,
without any border or content. However, custom dimensions can be defined using the CSS height and width properties,
while borders can be applied using the CSS border property.
The HTML canvas element empowers developers to unleash their creativity through canvas drawing, graphics, animation, rendering, shapes, styling, effects, transformations, text, images, patterns, gradients, and browser compatibility, enabling visually stunning and interactive experiences on the web.
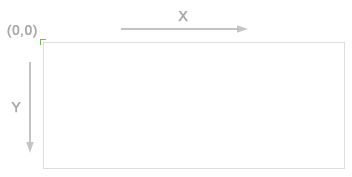
Understanding Canvas Coordinates
The canvas represents a two-dimensional rectangular area. The top-left corner of the canvas is denoted by the coordinates (0, 0), known as the origin,
while the bottom-right corner is determined by the coordinates (canvas width, canvas height).
Here is a basic example illustrating the canvas's default coordinate system.
Drawing Path and Shapes on Canvas
The following is a fundamental template for creating paths and shapes on the 2D HTML5 canvas.
<html lang="en">
<head>
<style>
	canvas {
		border: 2px solid blue;
	}
</style>
<script>
    window.onload = function () {
        var canvas = document.getElementById("myCanvas");
        var context = canvas.getContext("2d");
        // draw stuff here
    };
</script>
</head>
<body>
    <canvas id="myCanvas" width="200" height="100"></canvas>
</body>
</html>
The anonymous function attached to the window.onload event will execute when the page
finishes loading. Once the page is loaded, we can access the canvas element using the document.getElementById() method. Later, we establish a 2D
canvas context by invoking the getContext() method of the canvas object with the 2d parameter.
With HTML canvas drawing, you can unleash your creativity through path manipulation, shape rendering, and styling. Explore the versatility of canvas curves, lines, arcs, polygons, and bezier curves to bring your designs to life. Add animation, transformations, and interactivity to your canvas shapes, all while optimizing for performance and following best practices for a seamless HTML canvas drawing experience.
List of HTML Canvas Methods and Properties
In HTML canvas, you can use various methods to draw and manipulate graphics on the canvas. Here's a list of some commonly used methods available for the HTML canvas element:
getContext(): This method is used to obtain a drawing context for the canvas. The context represents the type of drawing environment you want to use, such as2dfor 2D drawing orwebglfor 3D rendering. The returned context object provides various methods and properties to interact with the canvas and perform drawing operations.
Drawing Methods:
fillRect(): Draws a filled rectangle on the canvas with the specified position and size.strokeRect(): Draws a rectangular outline (stroke) on the canvas with the specified position and size.clearRect(): Clears the specified rectangular area on the canvas, making it transparent.fillText(): Draws filled text on the canvas at the specified position.strokeText(): Draws text with an outline (stroke) on the canvas at the specified position.drawImage(): Draws an image onto the canvas at the specified position.
Path Drawing Methods: These methods are used for drawing paths on the canvas, which can be lines, curves, and shapes.
fill(): Fills the current drawing path with the current fill style.stroke(): Strokes (outlines) the current drawing path with the current stroke style.beginPath(): Starts a new path or resets the current path.moveTo(): Moves the starting point of the path to a new position.lineTo(): Draws a line from the current position to the specified position.arc(): Adds an arc to the path, allowing you to draw circles and parts of circles.rect(): Creates a rectangular path at the specified position and size.quadraticCurveTo(): Adds a quadratic Bézier curve to the path.bezierCurveTo(): Adds a cubic Bézier curve to the path.closePath(): Closes the current path by drawing a line to the starting point.
Styling and Configuration Methods:
fillStyle: Sets the fill color or style for drawing shapes.strokeStyle: Sets the stroke color or style for drawing outlines.lineWidth: Sets the width of lines used in stroke operations.lineCap: Sets the style for the ends of lines (e.g.,butt,round,square).lineJoin: Sets the style for the corners where lines meet (e.g.,round,bevel,miter).globalAlpha: Sets the transparency (alpha value) for drawing operations.
Transformations:
rotate(): Rotates the canvas context around a specific point.scale(): Scales the canvas context in the x and y directions.translate(): Translates the canvas context along the x and y axes.transform(): Applies a 2D transformation matrix to the canvas context.setTransform(): Resets the current transformation to the identity matrix.
Miscellaneous:
canvas.width: Sets or returns the width of the canvas.canvas.height: Sets or returns the height of the canvas.getImageData(): Returns an ImageData object representing the pixel data of the canvas.putImageData(): Puts pixel data onto the canvas, allowing you to manipulate individual pixels directly.
Drawing a Line
The simplest path you can draw on the canvas is a straight line. The key methods used for this purpose are
MoveTo(), lineTo(), and stroke().
The moveTo() method determines the position of the drawing cursor on the canvas, while the lineTo() method
specifies the coordinates of the line's endpoint. Finally, the stroke() method is used to make the line visible.
Let's explore an example to see how it works.
<script>
window.onload = function () {
    var canvas = document.getElementById("myCanvas");
    var context = canvas.getContext("2d");
    context.moveTo(50, 150);
    context.lineTo(250, 50);
    context.stroke();
};
</script>
Drawing a Rectangle
To create rectangles and squares on the canvas, you can utilize the rect() method, which takes four parameters: the
x and y positions of the rectangle and its width and height.
The basic syntax for the rect() method is as follows:
context.rect(x, y, width, height); The JavaScript code below will draw a rectangle shape that is centered on the canvas.
<script>
                    window.onload = function () {
                        var canvas = document.getElementById("myCanvas");
                        var context = canvas.getContext("2d");
                        context.rect(60, 60, 150, 100);
                        context.stroke();
                    };
</script>
With HTML canvas rectangle drawing, you have the power to apply strokes and colors, add shadows and effects, position and align rectangles precisely on the canvas, and even incorporate text inside the rectangles. Customize your rectangle attributes, style them to match your vision, and control opacity and transparency for captivating visuals. Ensure responsiveness by adapting your canvas rectangles to different devices. Explore the possibilities of adding shadows to create depth and apply transformations for dynamic effects, expanding the creative potential of HTML canvas rectangle drawing.
Drawing a Circle
Unlike the rect() method, there is no dedicated method for drawing circles. However, you can achieve a fully enclosed arc,
effectively creating a circle, by using the arc() method.
The syntax for drawing a complete circle using the arc() method is as follows:
context.arc(centerX, centerY, radius, 0, 2 * Math.PI, false); The following example will draw a complete circle that is centered on the canvas.
<script>
                    window.onload = function () {
                        var canvas = document.getElementById("myCanvas");
                        var context = canvas.getContext("2d");
                        context.arc(150, 100, 80, 0, 2 * Math.PI, false);
                        context.stroke();
                    };
</script>
Discover the artistry of HTML canvas circle drawing as you bring your designs to life with precise strokes, vibrant colors, captivating shadows, and stunning effects. Explore the possibilities of positioning and aligning circles on the canvas, adding text inside them, customizing attributes for enhanced styling, and achieving opacity and transparency effects. With responsive techniques, ensure your canvas circles adapt seamlessly across different devices. Embrace the creative potential of shadow effects and transformations to unlock dynamic visuals in your HTML canvas circle drawings.
Applying Styles and Colors on Stroke
By default, the stroke color is black, and its thickness is one pixel. However, you can customize the stroke color and width using
the strokeStyle and lineWidth properties, respectively.
The example below demonstrates how to draw an orange line with a width of 5 pixels.
<script>
                    window.onload = function () {
                        var canvas = document.getElementById("myCanvas");
                        var context = canvas.getContext("2d");
                        context.lineWidth = 5;
                        context.strokeStyle = "purple";
                        context.moveTo(100, 150);
                        context.lineTo(250, 30);
                        context.stroke();
                    };
</script>
You can also set the cap style for lines using the lineCap property. There are three available styles:
butt, round, and square. Here's an example:
<script>
                    window.onload = function () {
                        var canvas = document.getElementById("myCanvas");
                        var context = canvas.getContext("2d");
                        context.lineWidth = 10;
                        context.strokeStyle = "red";
                        context.lineCap = "square";
                        context.arc(150, 200, 100, 1.1 * Math.PI, 1.9 * Math.PI, false);
                        context.stroke();
                    };
</script>
With HTML canvas stroke styles, you can unleash your creativity by customizing the stroke color, width, gradients, transparency, patterns, different cap and join styles, precise stroke alignment, effects, smooth stoke animation, and optimization. Combine strokes with fills to create visually appealing and responsive canvas drawings, ensuring cross browser compatibility for a seamless user experience.
Filling Colors inside Canvas Shapes
To fill colors inside canvas shapes, you can use the fillStyle() method. The following example illustrates how to fill a
rectangle shape with a purple color:
<script>
                    window.onload = function () {
                        var canvas = document.getElementById("myCanvas");
                        var context = canvas.getContext("2d");
                        context.rect(60, 80, 200, 100);
                        context.fillStyle = "purple";
                        context.fill();
                        context.lineWidth = 5;
                        context.strokeStyle = "yellow";
                        context.stroke();
                    };
</script>
Tip: When styling shapes on the canvas, it is recommended to use the fill() method before
the stroke() method to ensure the stroke is rendered correctly.
Similarly, you can use the fillStyle() method to fill a solid color inside a circle as well.
<script>
                    window.onload = function () {
                        var canvas = document.getElementById("myCanvas");
                        var context = canvas.getContext("2d");
                        context.arc(150, 150, 80, 0, 2 * Math.PI, false);
                        context.fillStyle = "purple";
                        context.fill();
                        context.lineWidth = 5;
                        context.strokeStyle = "black";
                        context.stroke();
                    };
</script>
With HTML canvas, you can enhance your designs by applying various fill colors, such as solid, gradient, pattern, and radial fills. Adjust fill opacity to achieve the desired transparency effect. Explore the creativity of filling shapes with images, animate fills for dynamic visuals, optimize fill rendering for performance, customize fills to match your artistic vision, and ensure fill and stroke combinations for stunning effects. Achieve responsiveness and cross-browser compatibility with HTML canvas fill attributes, elevating the visual impact of your canvas creations.
Filling Gradient Colors inside Canvas Shapes
In addition to solid colors, you can also fill canvas shapes with gradient colors, which create a smooth visual transition from one color to another. There are two types of gradients available: linear and radial.
To create a linear gradient, you can use the createLinearGradient() method. The basic syntax for creating a linear gradient is as follows:
var grd = context.createLinearGradient(startX, startY, endX, endY); The example below demonstrates how to fill a linear gradient color inside a rectangle using the createLinearGradient() function.
Let's explore it to understand how it works:
<script>
                    window.onload = function () {
                        var canvas = document.getElementById("myCanvas");
                        var context = canvas.getContext("2d");
                        context.rect(60, 60, 150, 100);
                        var grd = context.createLinearGradient(0, 0, canvas.width, canvas.height);
                        grd.addColorStop(0, 'pink');
                        grd.addColorStop(1, 'yellow');
                        context.fillStyle = grd;
                        context.fill();
                        context.stroke();
                    };
</script>
Similarly, you can fill canvas shapes with radial gradients using the createRadialGradient() method. The basic syntax for
creating a radial gradient is as follows:
var grd = context.createRadialGradient(startX, startY, startRadius, endX, endY, endRadius); The following example utilizes the createRadialGradient() method to fill a radial gradient color inside a circle. Let's try it
out to see how it actually works:
<script>
                    window.onload = function () {
                        var canvas = document.getElementById("myCanvas");
                        var context = canvas.getContext("2d");
                        context.arc(150, 100, 80, 0, 2 * Math.PI, false);
                        var grd = context.createRadialGradient(100, 100, 15, 100, 100, 100);
                        grd.addColorStop(0, 'orange');
                        grd.addColorStop(1, 'green');
                        context.fillStyle = grd;
                        context.fill();
                        context.stroke();
                    };
</script>
With HTML canvas gradient fills, you can bring your designs to life by applying dynamic color transitions to shapes. Explore linear gradient fills for smooth color progressions along a line, or radial gradient fills to create captivating radial color effects. Customize gradient fill styles, adjust gradient direction, and control opacity for stunning visual impact. Elevate your canvas creations further by animating gradient fills, adding motion and dimension to your designs.
Drawing Text on Canvas
You can also draw text on the canvas. The text can include any Unicode characters. The example below demonstrates how to draw a simple greeting message, "Hello World!", on a canvas.
<script>
    window.onload = function () {
        var canvas = document.getElementById("myCanvas");
        var context = canvas.getContext("2d");
        context.font = "bold 30px italic";
        context.fillText("Happy Morning!", 10, 50);
    };
</script>
Additionally, you can set the color and alignment of the text on the canvas, as shown here:
<script>
                    window.onload = function () {
                        var canvas = document.getElementById("myCanvas");
                        var context = canvas.getContext("2d");
                        context.font = "bold 32px italic";
                        context.textAlign = "center";
                        context.textBaseline = "middle";
                        context.fillStyle = "blue";
                        context.fillText("Happy Morning!", 150, 100);
                    };
</script>
You can also apply a stroke to the text using the strokeText() method. This method outlines the text instead of filling it. However, if you
want to set both the fill and stroke on canvas text, you can use both the fillText() and strokeText() methods together.
<script>
                    window.onload = function () {
                        var canvas = document.getElementById("myCanvas");
                        var context = canvas.getContext("2d");
                        context.font = "bold 30px italic";
                        context.textAlign = "center";
                        context.textBaseline = "middle";
                        context.strokeStyle = "green";
                        context.strokeText("Hello World!", 150, 40);
                    };
</script>
Tip: When styling text on the canvas, it is recommended to use the fillText() method before the
strokeText() method to ensure the stroke is rendered correctly.
With HTML canvas text drawing, you can create visually appealing designs by applying text effects, exploring vertical and rotated text orientations, setting custom font colors and sizes, animating text elements, and even applying gradient colors to make your text pop. Enhance your canvas creations with HTML5 canvas text styling, precise text alignment and positioning, transformations for dynamic effects, opacity control, and responsive text that adapts seamlessly across devices. Don't forget to experiment with text shadows to add depth and dimension to your HTML canvas text.
Drawing Images
To draw images on an HTML canvas, you can use the drawImage() method of the canvas 2D rendering context. Here is an example:
<script>
window.onload = function() {
const canvas = document.getElementById("myCanvas");
const context = canvas.getContext("2d");

const image = new Image();
image.src = "image-tree.png";

// Wait for the image to load
image.onload = function() {
// Draw the image on the canvas
context.drawImage(image, 50, 50, 200, 150);
};
};
</script>
In the above code, To render images on an HTML canvas, you can utilize the drawImage() method provided by the 2D context. Begin by obtaining the
canvas element and its 2D context. Then, create an Image object to store the image data and set its source to the image file path. Once the image loads successfully,
invoke the drawImage() method with the Image object and specify the desired position and size to display the image on the canvas.
With HTML canvas, you can bring images to life by drawing them on the canvas, rotating them for dynamic effects, applying strokes and colors to enhance their appearance, adding text inside images, applying gradient colors to create eye-catching visuals, aligning and positioning images precisely, and leveraging HTML canvas image attributes for customization. Take it further by applying various effects, such as filters and transparency masks, to manipulate and enhance canvas images. Achieve responsiveness and compatibility while exploring transformations, animations, blending modes, cropping techniques, opacity control, and image manipulation capabilities with HTML canvas.
FAQ
What is the HTML <canvas> element?
The <canvas> element is an HTML5 element that serves as a drawing area for graphics, animations, and interactive content. It enables developers to create dynamic visual content using JavaScript and the HTML5 Canvas API.
How can you create a canvas element in HTML?
To create a canvas element, you utilize the <canvas> tag and specify attributes for its dimensions. Here's an example:
<canvas id="myCanvas" width="400" height="200"></canvas>
In this snippet, the canvas has the ID "myCanvas" and is 400 pixels wide and 200 pixels high.
How do you define the dimensions of a canvas using HTML attributes?
You can define the dimensions of a canvas using the width and height attributes within the <canvas> tag. For example, <canvas width="500" height="300"></canvas> would create a canvas with a width of 500 pixels and a height of 300 pixels.
What is the default size of a <canvas> element if no dimensions are specified?
If you don't specify the dimensions of a <canvas> element using the width and height attributes, it will have a default width of 300 pixels and a default height of 150 pixels.
How can you set the background color of a canvas?
You can set the background color of a canvas by applying a CSS style to the canvas element. For example, you can use the background-color property in CSS to set the background color: <canvas style="background-color: blue;"></canvas>. Alternatively, you can set the background color dynamically using JavaScript by drawing a filled rectangle that covers the entire canvas with the desired color.
What is the getContext() method used for in relation to the <canvas> element?
The getContext() method is used to obtain the rendering context and the drawing functions associated with a canvas element. By passing the argument "2d" to getContext(), you can get the 2D rendering context that provides methods to draw and manipulate graphics on the canvas.
const canvas = document.getElementById('myCanvas');
const context = canvas.getContext('2d');
What are some of the common methods used to draw shapes on a canvas?
Some common methods used to draw shapes on a canvas include fillRect() and strokeRect() for rectangles, arc() for circles and arcs, beginPath() and closePath() for creating paths, and fill() and stroke() to fill or stroke the defined paths or shapes.
Could you explain how to draw a line on the canvas using JavaScript?
To draw a line on the canvas, you need to access the 2D drawing context using the getContext() method. Then, you use methods like beginPath(), moveTo(), and lineTo() to define and render the line. Here's a step-by-step example:
context.beginPath();       // Begin a new path
context.moveTo(50, 50);   // Move the starting point
context.lineTo(150, 150); // Define the ending point
context.stroke();         // Render the line
In this code, a line is drawn from the point (50, 50) to the point (150, 150) on the canvas.
How can you create dashed lines on the canvas?
You can create dashed lines by setting the lineDash property of the 2D context before drawing a path. The lineDash property takes an array of numbers representing the lengths of alternating dashes and gaps. Here's an example:
context.setLineDash([5, 5]); // 5px dash, 5px gap
context.beginPath();
context.moveTo(50, 50);
context.lineTo(200, 50);
context.stroke();
What is the role of the lineCap property in the canvas?
The lineCap property defines how the end points of lines are drawn. It can be set to "butt" (default), "round", or "square". For example:
context.lineCap = "round"; // Rounded line ends
context.strokeRect(50, 50, 100, 100);
How do you go about drawing a rectangle on the canvas?
Drawing a rectangle on the canvas involves using methods like fillRect() or strokeRect() provided by the 2D context. Here's an example illustrating both approaches:
context.fillRect(50, 50, 100, 75);   // Filled rectangle
context.strokeRect(50, 50, 100, 75); // Outlined rectangle
The code creates a filled rectangle and an outlined rectangle, both with a top-left corner at (50, 50), a width of 100 pixels, and a height of 75 pixels.
What role do the fillStyle and strokeStyle properties play in canvas drawing?
The fillStyle property sets the fill color for shapes drawn using methods like fillRect(). The strokeStyle property defines the outline color for shapes created with methods like strokeRect(). You can use CSS color values to specify these properties and customize the appearance of your canvas graphics.
How can you draw a circle on the canvas using JavaScript?
To draw a circle on the canvas, you can utilize the arc() method of the 2D context. Here's an example:
context.beginPath();
context.arc(100, 100, 50, 0, 2 * Math.PI); // Parameters: x, y, radius, start angle, end angle
context.stroke();
In this code, a circle with a center at (100, 100), radius of 50 pixels, and spanning from 0 to 2π radians (a full circle) is drawn.
How do you create text on the canvas?
You can add text to the canvas using the fillText() or strokeText() methods of the 2D context. Here's an example:
context.font = '24px Arial';
context.fillStyle = 'black';
context.fillText('Hello, Canvas!', 50, 100);
This code sets the font size and style, specifies the fill color, and then writes the text "Hello, Canvas!" at the position (50, 100).
How can you draw text along a path on the canvas?
You can use the context.fillText() method with the context.arc() method to draw text along a circular path. Here's an example:
context.font = '16px Arial';
context.beginPath();
context.arc(150, 150, 100, 0, Math.PI * 2);
context.fillText('Text Along Path', 150, 150);
How can you create shadows for shapes drawn on the canvas?
Shadows can be added using the shadowColor, shadowOffsetX, shadowOffsetY, shadowBlur properties of the 2D context. For example:
context.shadowColor = "rgba(0, 0, 0, 0.5)";
context.shadowOffsetX = 5;
context.shadowOffsetY = 5;
context.shadowBlur = 10;
context.fillRect(50, 50, 100, 100);
How can you create a clipping region on the canvas?
You can create a clipping region using the context.clip() method. Anything drawn after applying the clipping path will only be visible within the defined region. For example:
context.beginPath();
context.arc(150, 150, 100, 0, Math.PI * 2);
context.clip();
context.fillRect(0, 0, canvas.width, canvas.height); // Only visible within the clipped circle
How can you clear the contents of a canvas?
To clear the contents of a canvas, you can use the clearRect() method of the 2D context. This method allows you to specify a rectangle to clear. For example:
context.clearRect(0, 0, canvas.width, canvas.height);
This code clears the entire canvas by specifying a rectangle that covers the entire canvas area.
How can you create gradients on the canvas?
Gradients can be created on the canvas using the createLinearGradient() and createRadialGradient() methods of the 2D context. Here's an example of creating a linear gradient:
const gradient = context.createLinearGradient(0, 0, canvas.width, 0);
gradient.addColorStop(0, 'red');
gradient.addColorStop(1, 'blue');

context.fillStyle = gradient;
context.fillRect(0, 0, canvas.width, canvas.height);
In this code, a linear gradient is created from left to right, transitioning between red and blue colors.
How can you create a text gradient effect on the canvas?
To create a text gradient effect, you can use the createLinearGradient() method for the strokeStyle or fillStyle of the text. Here's an example:
const canvas = document.getElementById('myCanvas');
const context = canvas.getContext('2d');

const gradient = context.createLinearGradient(50, 50, 250, 50);
gradient.addColorStop(0, 'red');
gradient.addColorStop(0.5, 'yellow');
gradient.addColorStop(1, 'green');

context.font = '48px Arial';
context.strokeStyle = gradient;
context.lineWidth = 2;
context.strokeText('Gradient Text', 50, 100);
In this code, text is drawn with a gradient stroke to create a gradient text effect.
How do you apply transformations to objects drawn on the canvas?
Transformations like translations, rotations, scaling, and skewing can be applied to canvas objects using transformation methods such as translate(), rotate(), scale(), and transform(). Here's an example of translating and rotating a rectangle:
context.translate(100, 100);   // Translate to (100, 100)
context.rotate(Math.PI / 4);    // Rotate by 45 degrees (π/4 radians)
context.fillRect(-50, -25, 100, 50); // Draw the rectangle at the translated and rotated position
This code first translates the canvas origin to (100, 100), then rotates the context, and finally draws a rectangle at the adjusted position.
How can you save and restore the canvas state?
You can save and restore the canvas state using the save() and restore() methods of the 2D context. These methods allow you to preserve and later restore properties like transformations, colors, and other settings. For example:
context.save();   // Save the current state
context.fillStyle = 'green';
context.fillRect(0, 0, 100, 100);

context.restore(); // Restore the saved state
context.fillRect(150, 0, 100, 100); // Draw with the original state
In this code, the first rectangle is drawn with a green fill, and the second rectangle is drawn with the original fill style after restoring the saved state.
How can you create complex shapes, such as polygons, on the canvas?
Complex shapes like polygons can be drawn on the canvas by defining paths using methods like beginPath(), moveTo(), and lineTo(). For example, to draw a triangle:
context.beginPath();
context.moveTo(100, 100);
context.lineTo(150, 150);
context.lineTo(50, 150);
context.closePath();
context.fill(); // Fill the triangle
In this code, a triangle is drawn by defining the vertices and closing the path.
What is the difference between the fillRect() and strokeRect() methods?
The fillRect() method is used to draw a filled rectangle on the canvas, applying the current fill style. On the other hand, the strokeRect() method draws an outlined (stroked) rectangle using the current stroke style. You can use these methods to create rectangles with different visual effects.
What is the difference between fill() and stroke() methods in the canvas?
The fill() method fills the current path with the current fill style, while the stroke() method outlines the current path with the current stroke style. Depending on whether you want to fill the interior of a shape or just draw its outline, you would use either fill() or stroke().
How can you draw images on the canvas?
To draw images on the canvas, you can use the drawImage() method of the 2D context. This method allows you to specify an image, its source position, and dimensions on the canvas. Here's an example:
const image = new Image();
image.src = 'image.png';

image.onload = function() {
    context.drawImage(image, 50, 50, 100, 75);
};
In this code, the image is loaded and drawn on the canvas with a specified position and size.
How can you capture canvas content as an image using the toDataURL() method?
The toDataURL() method converts the contents of the canvas to a data URL, which can be used as an image source or saved as an image file. Here's an example:
const imageDataURL = canvas.toDataURL(); // Default format is PNG
You can specify the desired image format by passing the appropriate MIME type to the toDataURL() method.
How can you rotate and flip an image drawn on the canvas using the drawImage() method?
You can use the drawImage() method's optional parameters to control the transformation of the drawn image. To rotate an image, you can use the context.rotate() method before drawing the image:
context.rotate(Math.PI / 4); // Rotate by 45 degrees
context.drawImage(image, x, y);
To flip an image horizontally, you can use a negative value for the image width:
context.scale(-1, 1); // Flip horizontally
context.drawImage(image, x, y);
How can you draw images with rounded corners on the canvas?
To draw images with rounded corners, you can use the clip() method along with context.arc() to create a circular clipping path. Then, draw the image inside the clipped area. For example:
context.beginPath();
context.arc(100, 100, 50, 0, Math.PI * 2);
context.clip();
context.drawImage(image, 50, 50, 100, 100); // Image with rounded corners
How can you create patterns on the canvas?
You can create patterns on the canvas using the createPattern() method of the 2D context. This method takes an image or canvas element as a source and creates a pattern that can be used as a fill style. Here's an example:
const image = new Image();
image.src = 'pattern.png';

image.onload = function() {
    const pattern = context.createPattern(image, 'repeat');
    context.fillStyle = pattern;
    context.fillRect(0, 0, canvas.width, canvas.height);
};
In this code, an image is used to create a pattern that's then used as the fill style for a rectangle.
How can you create animations using the <canvas> element?
Animations on the canvas are typically created by repeatedly clearing the canvas and redrawing objects in different positions over time. This is often done using techniques like the requestAnimationFrame() function. Here's a simplified example of animating a moving rectangle:
function animate() {
    context.clearRect(0, 0, canvas.width, canvas.height);
    context.fillRect(x, 50, 50, 50);
    x += 1; // Move the rectangle's x-coordinate
    requestAnimationFrame(animate);
}

let x = 0;
animate();
In this code, the rectangle is cleared and redrawn with an updated position in each animation frame, creating the illusion of movement.
How can you create a responsive canvas that adjusts to the window size?
To create a responsive canvas, you can use JavaScript to update the canvas dimensions when the window is resized. Here's an example:
function resizeCanvas() {
    canvas.width = window.innerWidth;
    canvas.height = window.innerHeight;
}

window.addEventListener('resize', resizeCanvas);
resizeCanvas(); // Call initially to set canvas size
In this code, the resizeCanvas() function is triggered whenever the window is resized, ensuring that the canvas adapts to the new dimensions.
How can you save the content of a canvas as an image file on the user's device?
You can save canvas content as an image file by using the toDataURL() method to generate a data URL and then prompting the user to download it. Here's an example:
const link = document.createElement('a');
link.href = canvas.toDataURL('image/png');
link.download = 'canvas-image.png';
link.click();
This code creates a link element that, when clicked, triggers the download of the canvas content as a PNG image.
How can you create a patterned fill for a shape using an image on the canvas?
To create a patterned fill using an image, you can use the context.createPattern() method. Here's an example:
const canvas = document.getElementById('myCanvas');
const context = canvas.getContext('2d');

const image = new Image();
image.src = 'pattern.png';

image.onload = function() {
    const pattern = context.createPattern(image, 'repeat'); // Parameters: image, repetition style
    context.fillStyle = pattern;
    context.fillRect(50, 50, 200, 150); // Draw a rectangle with a patterned fill
};
In this code, a rectangle is drawn with a patterned fill using an image.
How can you apply a zoom effect to an image on the canvas using the drawImage() method?
To apply a zoom effect, you can change the width and height of the drawImage() method's destination rectangle. Here's an example:
const canvas = document.getElementById('myCanvas');
const context = canvas.getContext('2d');

const image = new Image();
image.src = 'image.png';

image.onload = function() {
    context.drawImage(image, 50, 50, 100, 75); // Original size
    context.drawImage(image, 150, 150, 200, 150); // Zoomed-in size
};
In this code, an image is drawn at both its original size and a larger size to create a zoom effect.
How can you draw dashed curves on the canvas using the setLineDash() method?
To draw dashed curves, you can use the setLineDash() method to specify an array of dash and gap lengths. Combine this with the context.lineDashOffset property to control the starting point of the dash pattern. For example:
context.setLineDash([5, 5]); // Dashed pattern: 5px dash, 5px gap
context.lineDashOffset = 0; // Offset for starting point
context.beginPath();
context.moveTo(50, 150);
context.quadraticCurveTo(150, 100, 250, 150);
context.stroke();
How can you apply global transparency to all shapes drawn on the canvas using the globalAlpha property?
You can apply global transparency to all shapes using the context.globalAlpha property, which sets the alpha (transparency) value for subsequent drawings. Here's an example:
const canvas = document.getElementById('myCanvas');
const context = canvas.getContext('2d');

context.fillStyle = 'blue';
context.globalAlpha = 0.5; // Set global transparency
context.fillRect(50, 50, 100, 75); // Draw a translucent blue rectangle
In this code, a translucent blue rectangle is drawn with the global alpha value set to 0.5 (50% transparency).
How can you draw an ellipse on the canvas using Bézier curves?
To draw an ellipse, you can use Bézier curves to approximate its shape. Here's an example:
const canvas = document.getElementById('myCanvas');
const context = canvas.getContext('2d');

context.beginPath();
context.moveTo(150, 50); // Starting point
context.bezierCurveTo(200, 50, 250, 150, 150, 150); // Control points and ending point
context.bezierCurveTo(50, 150, 100, 50, 150, 50); // Control points and starting point
context.closePath();
context.stroke(); // Draw the ellipse outline
In this code, an ellipse is drawn using two Bézier curves that approximate its shape.
How can you create a cutout text effect on a shape using the globalCompositeOperation property?
To create a cutout text effect, you can use the globalCompositeOperation property to set the composition mode. Here's an example:
const canvas = document.getElementById('myCanvas');
const context = canvas.getContext('2d');

context.fillStyle = 'blue';
context.fillRect(50, 50, 150, 100); // Base shape

context.globalCompositeOperation = 'destination-out';
context.font = '48px Arial';
context.fillText('Cutout Text', 60, 130); // Cutout text from the shape
In this code, a shape is drawn, and then text is drawn with the destination-out composition mode to create a cutout effect.
How can you create an animated transition effect between two images on the canvas?
To create an animated transition effect between two images, you can use a combination of image drawing and alpha blending within an animation loop. Here's an example:
const canvas = document.getElementById('myCanvas');
const context = canvas.getContext('2d');

const image1 = new Image();
const image2 = new Image();
image1.src = 'image1.png';
image2.src = 'image2.png';

let alpha = 0;

function animateImageTransition() {
    context.clearRect(0, 0, canvas.width, canvas.height);

    context.globalAlpha = 1 - alpha; // Decrease alpha for image1
    context.drawImage(image1, 0, 0, canvas.width, canvas.height);

    context.globalAlpha = alpha; // Increase alpha for image2
    context.drawImage(image2, 0, 0, canvas.width, canvas.height);

    context.globalAlpha = 1; // Reset global alpha

    alpha += 0.01; // Increase alpha for transition

    if (alpha < 1) {
        requestAnimationFrame(animateImageTransition);
    }
}

animateImageTransition();
In this code, an animated transition effect is created between two images using alpha blending.
Are there any limitations or considerations when using the <canvas> element?
Yes, there are a few considerations to keep in mind:
- The canvas is essentially a bitmap, so scaling it can lead to pixelation.
- The canvas is not very accessible to screen readers and SEO.
- Complex animations might require careful memory management to avoid performance issues.
- The canvas relies on JavaScript for interactivity, making it less straightforward for static content.
When deciding to use the <canvas> element, consider your project's requirements and whether its features align well with your goals.
Conclusion
the HTML canvas element is a powerful and versatile feature that enables web developers to create dynamic and interactive graphics directly within web pages. With the ability to draw paths and shapes, developers can create complex and visually appealing illustrations, diagrams, and animations. The canvas element also allows for the incorporation of text and images, enhancing the user experience by providing informative content and engaging visuals.
Whether it's building interactive games, data visualizations, or artistic displays, the HTML canvas element remains a valuable asset for developers seeking to push the boundaries of web design and user engagement.